fullstack-serverless
Run at web scale for pennies*

![]()
![]()


Fullstack-Serverless is a Serverless.com framework plug-in to deploy a full stack serverless application on AWS.
TL;DR
Installation npm install --save-dev fullstack-serverless
fullstack-serverless documentation is here
It supports
- Your custom domain name
- Free SSL from AWS for your domain
- An AWS Web Application Firewall
- Single page apps (React, Angular, Vue, etc)
- Multi page content (hand coded html, static blog generators like hexo, or whatever you can imagine)
- CloudFront CDN distributed caching of both static content and API requests
- Hosting only static content, ApiGateway is not created if lambda functions with http triggers are not defined
Typical fullstack-serverless deployment
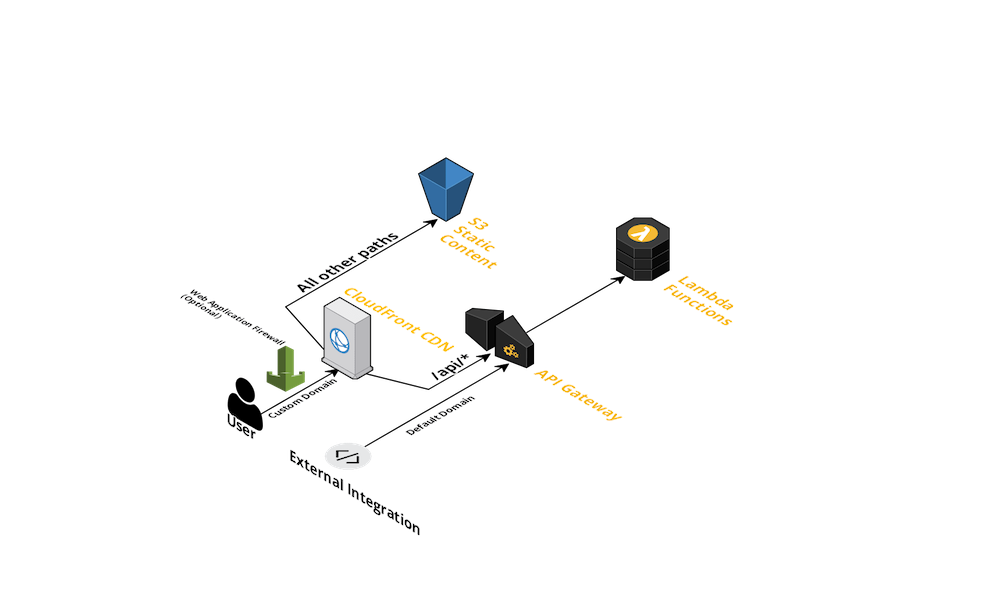
Traffic to your domain is routed through the CloudFront distribution. Requests to your API path (/api/*) are sent to ApiGateway which routes it to the configured Lambda function. Requests to all other paths resolve to static content served from S3.
Single page vs Multi page content
fullstack-serverless can be configured to deploy either single page apps or traditional multi page content.
For single page apps all non-API traffic that does not resolve to an actual resource (such as requests to a folder /any/folder/) are sent to the default document (indexDocument eg. index.html) so that the single page app can handle routing.
singlePageApp = trueSingle page mode
In single page mode CloudFront is configured to use the REST API for S3, and content in S3 is not public. All 403 errors (the API returns 403, access not allowed, for resources that do not exist) are routed to the default document (indexDocumenteg. index.html).http://mydomain.io/any/folderwill servehttp://mydomain.io/index.htmlIn this mode your app must to handle routing.singlePageApp = falseMulti page content mode
For standard content mode requests for non-API traffic are routed to S3 using the http interface, and content in S3 is public (read only). This is a quirk on the way S3 handles default document configuration, in order to serve theindexDocumentfrom any given folder,http://mydomain.io/any/folderwill servehttp://mydomain.io/any/folder/index.html
CloudFront caching
fullstack-serverless sets up a CloudFront distribution in front of your static content and API.
This allows for blazing fast access to your site globally at very low prices. As well as reducing calls to your API Lambdas, also reducing your cost per call. While caching is amazing, it introduces a few additional considerations.
Static content
When you deploy updated content, it may not be available until the cached version expires. Whereas new content will always be immediately served. This can lead to version mismatches when new features are deployed. To prevent this you can create a cache invalidation. Invalidations can be as specific as a single resource, or as broad as everything. AWS allows for 1000 free invalidations a month. It doesn’t matter if you create an invalidation for a single resource or thousands, it still counts as one. From the CLI creating an invalidation for all cached content looks like this:
aws cloudfront create-invalidation --distribution-id <CloudFront distro id> --paths '/*'
You can find the ID for your CloudFront distro in the AWS CloudFront console.
API
The same thing applies to caching of API requests, when you deploy a new version of a Lambda, consider creating an invalidation for your API resources as well.
aws cloudfront create-invalidation --distribution-id <CloudFront distro id> --paths '/api/*'
For API calls to work correctly, you must include appropriate cache hearers in the response and design your API resources to work well with caching. RESTful services are a good example of how to do this.
Cost
There are also cost considerations when using CloudFront in front of ApiGateway. Both products charge you for usage, double charging for each call on a cache miss. This is why setting the cache headers correctly in your function configuration is so important. For how to set headers on function responses see: Serverless ApiGateway documentation.
There are three categories for requests:
- Cacheable
The data from an endpoint does not change with every request, and every request should get the same response. It does not matter if some requests get ‘stale’ data.
Set a cache header with the longest possible cache length. These requests are the ideal situation, and will be the lowest cost. - Not Cacheable
The data can change with every request, and every request could need different data. Having up to date responses is important.
Set a no cache headerCache-Control: no-cache. Theses request will be billed for both CloudFront and ApiGateway every time. Ideally your request volume will be low. - External Integrations
Non user facing requests. Either users will not be aware that the domain of the request is not yours, or you don’t care. In this case you can use the URL provided by AWS for the function. Something like
https://randomstring.execute-api.us-east-1.amazonaws.com/my/api/function
A good example of when to do this is external integrations, like Slack web hooks, where end users will never be aware of the URL.
Setting up a custom domain
There are three steps to configuring your domain:
- Deploy your app to AWS to create the CloudFront distribution.
serverless deployIt will take several minutes the first time while the CloudFront distribution is created. - Route traffic to the CloudFront distribution
- If you are using AWS Route 53 to manage DNS follow Amazon’s guide Routing Traffic to an Amazon CloudFront Web Distribution by Using Your Domain Name.
- If using another DNS provider create a CNAME pointing to the CloudFront domain. fullstack-serverless will print out the domain when you deploy.
CloudFront domain name randomstring.cloudfront.net (CNAME: yourcooldomain.io)
If your DNS provider does not support root level CNAMEs, try redirecting root level traffic to ‘www.’www.yourdomain.ioand making www a CNAME to the CloudFront domain.
Some DNS providers that support domain aliasing (root level CNAMEs):
- Create an SSL certificate in CertificateManager
You can either Request a free certificate from AWS or Import one you already have. Requesting a certificate requires you to confirm you own the domain, so you will need admin access to configure the confirmation method you choose.
Syncing vs upload with client deploy
fullstack-serverless deploys your client assets to S3 for you when you deploy the full stack serverless deploy or just the client serverless client deploy, but gives you the the option to skip uploading them. fullstack-serverless deletes the contents of the S3 bucket and then uploads all the client files. If you are doing this frequently you can over run the upload limits of the S3 free tier. To reduce the number of uploaded files you can use the AWS CLI to sync your work to the S3 bucket instead. aws s3 sync dist/ s3://your-app-webapp-deploy --profile yourAWSProfile
to send only the files that have changed.
Examples
Some apps deployed using fullstack-serverless:
- This site! MadSkills.io
- Front Desk deploys a landing page, web UI, Alexa Skill, and Slack app
- Your app! If you deploy using fullstack-serverless, give us a shout to have your app listed here
Example Projects
Write ups and example code using fullstack-serverless
- Serverless Blog/Landing Page Coming soon
* Initially it could be free if you usage meets AWS free tier requirements. The average site will cost only a few cents a month to run, but your cost will scale with your traffic. However, you will be ready for web scale traffic when it comes!
